Free Online Resources for Easy and Simple Woodworking Projects

Unlock Your Inner Craftsperson: Free Online Resources for Easy Woodworking Projects

The satisfying scent of freshly cut wood, the smooth feel of handcrafted creation – woodworking offers a rewarding escape and a tangible connection to the creative process. But the thought of complex projects and expensive tools can be daunting for beginners. Fear not! A wealth of free online resources makes it easier than ever to embark on your woodworking journey, regardless of your skill level. This article explores some fantastic websites and platforms that provide simple, step-by-step instructions for easy woodworking projects, perfect for beginners.

Beginner-Friendly Websites and Channels

The internet is a treasure trove of woodworking knowledge, but sifting through the overwhelming amount of information can be tricky. Fortunately, many websites and YouTube channels cater specifically to beginners, offering projects that require minimal tools and experience. These resources often prioritize clear instructions, detailed diagrams, and even video tutorials that guide you through each step of the process. This visual learning approach makes even complex techniques more accessible. Look for sites and channels that emphasize the basics, such as safe tool use and fundamental woodworking techniques.

YouTube Channels for Visual Learners

Visual learners will find YouTube invaluable. Many channels showcase easy woodworking projects, often with a focus on simplicity and affordability. Search for terms like "easy woodworking projects for beginners," "beginner woodworking tutorials," or "simple wood crafts." Pay close attention to the channel's overall content; a channel consistently delivering high-quality, easy-to-follow instructions is a valuable resource. Don't be afraid to browse and compare different channels to find a style that suits your learning preferences.

Websites with Detailed Plans and Instructions

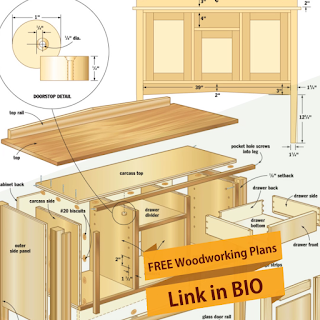
Numerous websites offer downloadable woodworking plans with detailed instructions, often accompanied by photos and illustrations. Some sites specialize in providing free plans for smaller, simpler projects perfect for beginners. These plans typically include cutting lists, materials lists, and step-by-step instructions, ensuring you have everything you need to successfully complete your project. These sites are invaluable for those who prefer a more structured learning approach with written instructions.

Choosing Your First Project: Simple & Rewarding

Starting with a simple project builds confidence and allows you to practice fundamental techniques before tackling more ambitious creations. Avoid complex joinery or intricate designs initially. Focus on projects that utilize straightforward cuts and basic assembly methods. Consider these beginner-friendly project ideas:

  • Simple Shelf or Coat Rack: A great introduction to basic cuts and assembly.
  • Wooden Box or Crate: Teaches you about miter cuts and joining techniques.
  • Cutting Board: A practical project that allows you to practice finishing techniques.
  • Birdhouse or Feeder: Fun and rewarding, introducing you to working with smaller pieces.

Essential Tools for Beginners

You don't need a fully equipped workshop to start woodworking. Begin with a few essential tools that you can gradually expand upon as your skills develop. These basic tools are usually sufficient for many beginner projects:

  • Measuring Tape and Pencil: Accurate measurements are crucial.
  • Hand Saw or Circular Saw: For cutting wood to size.
  • Screwdriver(s): For assembly.
  • Sandpaper: For smoothing surfaces.
  • Wood Glue: For strong and reliable joints.

Remember, safety is paramount. Always wear appropriate safety glasses and follow safety guidelines provided in your chosen woodworking plans or tutorials. Start slowly, practice regularly, and enjoy the rewarding process of transforming wood into beautiful and functional creations!

Share:

Craft Your Own Children’s Woodworking Projects with These Plans

Craft Your Own Children's Woodworking Projects with These Plans!

Hey there, fellow crafters! Are you looking for fun and engaging activities to do with your kids that also teach valuable skills? Look no further! Woodworking is a fantastic way to bond with your little ones, fostering creativity, problem-solving abilities, and a healthy respect for tools (with proper supervision, of course!). This guide is packed with kid-friendly woodworking project plans that are easy to follow, even for beginners. Get ready to unleash your inner builder!

Simple & Safe Projects for Little Hands (Ages 4-7)

For our youngest woodworkers, safety is paramount. These projects focus on simple techniques and readily available materials, minimizing risk and maximizing fun. Always supervise young children closely and consider using pre-cut wood pieces to reduce the need for complex tools.

1. Miniature Wooden Puzzles

This is a great introductory project! You'll need: some thin plywood scraps (about ¼ inch thick), a simple design (like a simple shape or a few connected squares), a coping saw (or a jigsaw with a fine blade for adults), sandpaper, and non-toxic paint or crayons. Cut the plywood into simple shapes, and then cut the shapes into puzzle pieces. Lightly sand the edges to remove any splinters. Let your child decorate their puzzle! You can even make matching pairs for extra learning.

2. Painted Wooden Spoons

Transform ordinary wooden spoons into unique works of art! Find some plain wooden spoons at a craft store or even in your kitchen drawer. Let your child unleash their creativity with paint, markers, glitter, or even decoupage. They can create animals, faces, or abstract designs – the possibilities are endless! Seal the finished artwork with a clear sealant for durability.

3. Building Blocks from Scrap Wood

Gather some small scraps of wood – even offcuts from other projects will do! With adult supervision using a saw, cut them into simple cube or rectangular shapes. Sand the edges thoroughly. Let your child paint or decorate the blocks in bright colours. These blocks are perfect for free play, encouraging imaginative building.

Intermediate Projects for Growing Skills (Ages 8-12)

As your child's skills develop, you can introduce more complex tools and techniques. Remember to always emphasize safety and proper tool use.

1. Simple Birdhouse

This classic project is a rewarding experience. You'll need: pre-cut wood pieces (or planed lumber if you're feeling adventurous), wood glue, small nails or screws, a hammer (or screwdriver), sandpaper, and exterior paint. Assemble the birdhouse following a simple plan readily available online. Ensure adult supervision is provided during nailing or screwing stages. Your child can help with painting and decorating!

2. Wooden Toy Car

This project requires a bit more planning and precision. You'll need: some thin plywood or balsa wood, a jigsaw, sandpaper, wheels (can be purchased pre-made), and paint. Find a simple toy car design online and cut the pieces. Assemble the car using wood glue and allow ample drying time. This is a great project for teaching about measuring and precision.

3. Wooden Coasters

These make great gifts! You'll need: small square or round pieces of wood (tile coasters are a good starting point!), sandpaper, wood finish, and decorative elements (like decoupage, paint, or tile mosaics). Sand the wooden pieces smooth. Let your child decorate the coasters using their favorite methods. Apply a protective wood finish once the decoration is dry.

Advanced Projects for Budding Woodworkers (Ages 13+)

Teenagers can tackle more ambitious projects with greater independence (though supervision is still recommended for safety). These projects require more precise measuring, cutting, and assembly.

1. Small Wooden Shelf

A simple shelf is a functional and satisfying project. You'll need: wood planks, wood screws, a drill, a level, sandpaper, and wood finish. This project teaches essential woodworking skills like measuring, drilling pilot holes, and assembling components. Adult supervision is necessary for using power tools.

2. A Simple Wooden Box

Perfect for storage or gifting, a wooden box offers practice in precise joinery. You'll need: wood planks, wood glue, clamps, sandpaper, and wood finish. Explore different joinery techniques (like miter joints or butt joints) to improve skill. Again, adult supervision is essential, especially with clamps.

3. A Small Wooden Bench

A small, simple bench is a challenging but rewarding project. This will involve detailed planning, accurate cuts, and secure joinery. You'll need: wood planks, wood screws or bolts, a drill, sandpaper, wood finish, and possibly a sawhorse for assembly. This is a project best tackled with considerable adult supervision and support.

Commonly Asked Questions

Q: What kind of wood is best for kids' woodworking projects?

A: Softwoods like pine or balsa wood are ideal for beginners. They're easier to cut and less likely to splinter.

Q: What safety precautions should I take?

A: Always supervise children closely, especially when using tools. Make sure they wear safety glasses. Teach them about proper tool handling and storage. Consider using pre-cut wood for younger children to minimize the risk of injury.

Q: Where can I find plans for these projects?

A: Many free woodworking plans are available online. Search for "kid-friendly woodworking projects" or "easy woodworking projects for beginners."

Q: What tools do I need?

A: For simpler projects, you might only need a saw (hand saw or coping saw), sandpaper, wood glue, and paint. For more advanced projects, you may need power tools like a drill or jigsaw. Always ensure you have the appropriate safety equipment.

Q: What if my child makes a mistake?

A: Mistakes are part of the learning process! Focus on the fun and encourage your child to try again. Woodworking is a journey of learning and creativity.

Happy crafting! Remember to prioritize safety and have fun creating memories with your children!

Share:

Sideboard Furniture Plans for Extra Storage and Style

Sideboard Furniture Plans for Extra Storage and Style

Transform your living space with a custom-built sideboard! This versatile piece of furniture offers ample storage while adding a touch of elegance and personality to any room. Forget generic, mass-produced units; this article provides comprehensive plans to guide you through creating your dream sideboard, tailored to your exact needs and aesthetic preferences. We'll cover everything from choosing the right materials to mastering the finishing touches, empowering you to build a sideboard you'll cherish for years to come.

Planning Your Perfect Sideboard

Before you reach for the tools, meticulous planning ensures a smooth building process and a stunning end result. Begin by visualizing your ideal sideboard. Consider its intended location, the surrounding décor, and the specific storage requirements. Do you need deep drawers for linens? Narrow shelves for glassware? Open compartments for displaying treasured items? Answering these questions shapes the dimensions and features of your design. Sketch your ideas, noting precise measurements for each component. Don't forget to account for door and drawer hardware, considering factors like the weight of contents and desired functionality (e.g., soft-close hinges).

Choosing Your Materials

The materials you select significantly impact both the aesthetics and durability of your sideboard. Hardwoods like oak, cherry, or walnut offer exceptional strength and a rich, luxurious look, though they come with a higher price tag. More budget-friendly options include pine or poplar, which still provide excellent results with proper finishing. For the interior, consider using plywood for its stability and affordability. Explore different wood finishes – stains, paints, or natural oils – to achieve your desired aesthetic. Remember to factor in the weight of the finished product when choosing materials for the base and legs.

Building Your Sideboard: A Step-by-Step Guide

With your plans finalized and materials gathered, you're ready to begin construction. This process generally involves several key steps. First, you will cut the wood pieces according to your detailed measurements. Precise cuts are paramount; use a high-quality saw and measure twice before each cut. Then, assemble the frame, ensuring strong joints using wood glue and screws. Next, construct the drawers and doors, fitting them precisely into their designated spaces. Finally, add the finishing touches – installing hardware, applying your chosen finish, and cleaning up any remaining debris. Remember to always follow safety precautions, using appropriate personal protective equipment (PPE) and working in a well-ventilated area.

Essential Tools and Techniques

Building a sideboard requires a collection of essential tools. These include a measuring tape, saw (circular saw or miter saw recommended), drill, screwdriver, sander, wood glue, clamps, and various woodworking chisels and hand tools. Mastering fundamental woodworking techniques, such as creating accurate cuts, assembling strong joints, and applying a smooth finish, will be key to your project's success. Consider investing in quality tools that will last and enhance the precision of your work. Consult online tutorials and woodworking guides if you're new to these techniques.

Adding Style and Personal Touches

Once the construction is complete, it's time to infuse your sideboard with personality. Consider adding decorative elements like custom-designed drawer pulls or unique knobs. You might also incorporate inlaid wood accents, carvings, or even a subtle paint effect to elevate the aesthetic appeal. The placement of the sideboard within your room also plays a vital role in its overall impact. Think carefully about lighting, and consider using accent lighting to showcase its features and the items stored inside.

Finishing Touches and Maintenance

The final step involves applying a protective finish to your sideboard. This protects the wood from scratches, moisture damage, and other wear and tear. Consider a clear sealant, a stain, or a painted finish, depending on your aesthetic preferences. After the finish has cured completely, clean the sideboard using appropriate furniture cleaning solutions and avoid placing heavy objects that may damage its structure. Regular maintenance will prolong the life of your custom-built sideboard.

Building your own sideboard is a rewarding project that allows for complete creative control. By following these plans and tips, you can create a beautiful, functional piece of furniture that will enhance your home for years to come. Enjoy the process!

Share:

Step-by-Step Table Furniture Plans for Beginners

Conquer Your DIY Dreams: Step-by-Step Table Furniture Plans for Beginners

Building your own furniture can feel daunting, but crafting a simple table is a fantastic starting point for any woodworking novice. This guide provides detailed, beginner-friendly plans, empowering you to create a functional and stylish piece for your home. We'll walk you through each step, ensuring you gain confidence and satisfaction with your finished project.

Choosing Your Table Type and Materials

Before diving into the construction, decide on your table's style and size. A simple coffee table or end table is an excellent first project. Consider the space you have available and the overall aesthetic of your room. For beginners, a square or rectangular top is easier to manage than a more complex shape.

Selecting the Right Wood

Pine is a popular choice for beginners due to its affordability, workability, and readily available sizes. Birch offers a slightly harder, more refined finish. Avoid hardwoods like oak or maple initially, as they require more advanced tools and techniques. When selecting your wood, check for knots, cracks, and warping—choose boards as straight and free of imperfections as possible. Purchase your lumber slightly oversized to account for cutting and sanding.

Essential Tools and Supplies

Gather these essential tools before you start:

  • Measuring Tape
  • Pencil
  • Circular Saw or Hand Saw
  • Safety Glasses
  • Wood Glue
  • Clamps
  • Sandpaper (various grits)
  • Screwdriver (or Drill with screwdriver bits)
  • Wood Screws
  • Wood Stain or Paint (optional)
  • Polyurethane or other sealant (optional)

Remember, safety is paramount. Always wear safety glasses when using power tools.

Building the Tabletop

Cut your chosen wood to the desired dimensions for the table top. For a simple design, use two long boards and two short boards to create a rectangular top. Remember to account for the thickness of the boards when measuring. Use a clamp to hold the boards securely together while applying wood glue along the edges. After applying glue, use screws to fasten the boards together. Ensure screws are countersunk to allow for a smooth surface after sanding.

Sanding for a Smooth Finish

Once the glue has dried, meticulously sand the tabletop. Begin with coarser sandpaper (around 80 grit) to remove any imperfections, gradually moving to finer grits (120, then 220) for a progressively smoother finish. Sand in the direction of the wood grain to avoid scratches. A random orbital sander can significantly speed up this process, but careful hand-sanding achieves excellent results as well.

Constructing the Table Legs and Frame

For stability, create a simple frame using four legs and connecting rails. Cut the legs and rails to your desired height and width. Use wood glue and screws to attach the legs to the rails, forming a sturdy rectangular frame. This frame will provide support for the tabletop.

Attaching the Tabletop to the Frame

Once the frame is securely assembled, carefully position the tabletop onto the frame, ensuring it's centered and aligned. Use wood glue and screws to fasten the tabletop to the frame, ensuring even pressure across all connection points. Countersink the screws for a smooth, flush surface.

Finishing Touches

Sand any remaining imperfections on the assembled table. Apply your chosen wood stain or paint, following the manufacturer's instructions. Allow ample drying time before applying a sealant, such as polyurethane, to protect your table from scratches, water damage, and general wear. This final step enhances the table's longevity and beauty.

Your Finished Masterpiece!

Congratulations! You've successfully built your own table. Enjoy your sense of accomplishment and the beautiful piece you created. Remember, practice makes perfect, and each project will build your confidence and skills. Now, go forth and furnish your home with your handmade creations!

Share:

American Furniture Plans for High-Quality and Timeless Designs

American Furniture Plans: A Legacy of High-Quality and Timeless Designs

American furniture boasts a rich history, marked by distinct stylistic periods and a commitment to craftsmanship that continues to inspire furniture makers today. From the elegant simplicity of Shaker designs to the ornate grandeur of Victorian pieces, American furniture plans offer a gateway to recreating these iconic styles and building enduring pieces for the modern home. This exploration delves into the diverse world of American furniture plans, examining their historical context, design principles, and the enduring appeal of handcrafted furniture.

The Evolution of American Furniture Styles

Understanding the evolution of American furniture styles is crucial to appreciating the nuances found within available plans. The designs weren't simply aesthetic choices; they reflected the socio-economic climate, available resources, and prevailing cultural influences of their time.

Early American & Colonial Styles (17th-18th Centuries):

Early American furniture, heavily influenced by European traditions, particularly English and Dutch styles, prioritized functionality and durability. Simple lines, sturdy construction, and the use of readily available materials like pine and oak characterized these pieces. Common features included turned legs, mortise-and-tenon joinery, and minimal ornamentation. The emphasis was on creating pieces that served practical purposes within the domestic sphere.

Plans for this period often involve detailed instructions on creating chairs, tables, chests, and beds using traditional woodworking techniques. These techniques, passed down through generations, are still valued by furniture makers today, ensuring the longevity and quality of the finished pieces.

Federal & Neoclassical Styles (Late 18th - Early 19th Centuries):

The Federal period witnessed a shift towards more refined and elegant designs, reflecting the influence of Neoclassical ideals. Inspired by the classical architecture and furniture of ancient Greece and Rome, this style emphasized symmetry, balance, and clean lines. Mahogany became a popular choice for its rich color and luxurious feel. Intricate inlay work and decorative elements, while present, remained relatively restrained compared to later periods. Plans from this era often showcase the use of refined joinery and precise measurements required to achieve the style's elegant proportions.

Victorian Style (Mid-19th Century):

The Victorian era ushered in an explosion of ornamentation and decorative detail. This period is characterized by a more eclectic approach, incorporating a variety of styles and influences. Ornate carvings, elaborate upholstery, and the use of darker woods like rosewood and ebony were hallmarks of Victorian furniture. While plans for Victorian pieces can be complex due to their intricate details, they also offer opportunities for highly personalized expressions of creativity.

Arts & Crafts Style (Late 19th - Early 20th Centuries):

Reacting against the excesses of the Victorian era, the Arts & Crafts movement championed simpler, more handcrafted designs. Inspired by nature and traditional craftsmanship, this style emphasized the use of natural materials, honest construction, and functional design. Simple lines, handcrafted details, and the use of locally sourced wood were prioritized. Plans for Arts & Crafts furniture often involve detailed instructions on creating intricate joinery and decorative elements, reflecting the movement's emphasis on skilled craftsmanship.

Mid-Century Modern Style (Mid-20th Century):

Mid-century modern furniture, characterized by its clean lines, functionality, and use of innovative materials, remains incredibly popular today. Simple geometric shapes, tapered legs, and the use of plywood and molded plastics distinguish this style. Plans for mid-century modern pieces often feature minimalist designs, highlighting the beauty of clean lines and unadorned surfaces.

The Appeal of American Furniture Plans

The enduring appeal of American furniture plans stems from several factors:

  • Historical Significance: These plans offer a connection to the rich history of American design and craftsmanship, allowing individuals to recreate iconic pieces and appreciate the evolution of styles.
  • Customization & Personalization: Plans provide a framework, allowing for customization in terms of materials, finishes, and size to suit personal preferences and the unique dimensions of one's home.
  • High-Quality Craftsmanship: Building furniture from plans encourages the use of high-quality materials and skilled techniques, resulting in durable and long-lasting pieces.
  • Cost-Effectiveness: While the initial investment in materials may be significant, building furniture from plans can often be more cost-effective than purchasing comparable ready-made pieces.
  • Sense of Accomplishment: The process of building furniture from plans provides a rewarding experience, fostering a sense of accomplishment and pride in creating something unique and lasting.

Finding and Using American Furniture Plans

A wealth of resources exists for finding high-quality American furniture plans. Books, magazines, online retailers, and websites specializing in woodworking plans offer a diverse selection of designs spanning various historical styles and skill levels. When selecting plans, it's crucial to carefully consider the following:

  • Skill Level: Choose plans that match your woodworking experience. Beginners should opt for simpler designs before tackling more complex projects.
  • Clarity of Instructions: Ensure the plans are clearly written and illustrated, providing detailed instructions and diagrams.
  • Material Specifications: Pay close attention to the specifications for wood types, dimensions, and hardware.
  • Reviews & Testimonials: Check online reviews and testimonials from other woodworkers to gauge the quality and accuracy of the plans.

Building furniture from plans requires patience, attention to detail, and a commitment to precision. However, the rewards are immeasurable, resulting in heirloom-quality pieces that add character, warmth, and a touch of history to any home. The legacy of American furniture design continues through the hands of dedicated woodworkers who cherish the art of handcrafted furniture and the timeless beauty of classic American styles.

Conclusion

American furniture plans offer a unique opportunity to connect with history, explore diverse design styles, and create enduring pieces for the modern home. By embracing the principles of high-quality craftsmanship and appreciating the nuances of each historical period, woodworkers can build furniture that is not only functional and beautiful but also reflects a deep appreciation for the rich heritage of American design.

Share:

Easy Rustic Wood Furniture Plans for Beginners

Easy Rustic Wood Furniture Plans for Beginners: Let's Build Something Awesome!

Hey there, fellow furniture enthusiasts! So you're dreaming of crafting your own rustic masterpieces, but the thought of complex joinery and intricate designs feels a bit overwhelming? Don't worry, you're not alone! This guide is all about breaking down the process and showing you that building beautiful, rustic furniture can be surprisingly accessible, even for complete beginners. We're focusing on simple designs, readily available materials, and straightforward techniques. Let's get started!

Choosing Your First Project: Simple & Satisfying

Picking the right first project is crucial. You want something rewarding enough to keep you motivated, but not so challenging that you get discouraged. Here are a few excellent beginner-friendly ideas:

Rustic Floating Shelves

Floating shelves are fantastic entry-level projects. They require minimal tools and skills, and the end result looks stunning in any room. You can use reclaimed wood for an extra rustic touch! Think about the size and number of shelves you need, and then simply cut the wood to length, attach hidden brackets to the wall, and carefully place the shelves on top. You can even add a bit of distressing for a more weathered look.

Simple Coffee Table

A rustic coffee table is a slightly more ambitious project, but still very manageable for beginners. You can build one using just four sturdy legs and a thick piece of wood for the tabletop. Use some simple woodworking glue and screws to secure the legs to the tabletop, and sand it all down for a smooth finish. Consider adding some hairpin legs for a modern rustic vibe!

Rustic Bench

A rustic bench is perfect for adding seating to your porch, entryway, or even bedroom. A simple design might involve two long pieces of wood for the seat and two shorter pieces for the legs. Again, screws and wood glue are your best friends here. You can get creative with the legs – perhaps slightly angled for a more rustic feel.

Essential Tools and Materials

Before you dive in, let's gather the necessary supplies. Don't feel pressured to buy everything at once; you can gradually build your toolkit over time.

Essential Tools:

  • Measuring tape
  • Pencil
  • Hand saw (or circular saw – if you're comfortable with power tools!)
  • Screwdriver (or drill/driver)
  • Wood glue
  • Sandpaper (various grits)
  • Safety glasses
  • Work gloves

Materials:

The materials you choose will largely depend on your project. For most beginner projects, untreated pine or reclaimed wood works perfectly. Reclaimed wood adds a unique character, but it can be more challenging to work with due to potential imperfections.

Step-by-Step Guide: Building a Simple Rustic Shelf

Let's walk through building a simple floating shelf together. This will give you a good feel for the basic process.

Step 1: Planning & Measuring

First, decide on the dimensions of your shelf. Measure carefully and mark your cuts on the wood. Remember to account for the brackets!

Step 2: Cutting the Wood

Carefully saw the wood to your marked lengths. Use a straight edge as a guide for cleaner cuts. If using a hand saw, take your time and be patient.

Step 3: Sanding

Sand all the edges and surfaces of the wood to smooth out any rough spots. Start with coarser sandpaper and gradually move to finer grits for a smooth finish.

Step 4: Attaching Brackets

Following the manufacturer's instructions, securely attach the hidden brackets to the wall. Ensure they are level and firmly in place.

Step 5: Placing the Shelf

Gently place the shelf onto the brackets. Test it out to make sure it's secure and stable.

Step 6: Finishing Touches (Optional)

You can stain, paint, or leave the shelf natural. A clear sealant will protect the wood and enhance its natural beauty.

Tips for Success

  • Start small: Choose a project that's within your skill level.
  • Measure twice, cut once: Accuracy is key in woodworking.
  • Take your time: Don't rush the process. Careful work leads to better results.
  • Safety first: Always wear safety glasses and gloves.
  • Have fun!: Enjoy the process of creating something with your own hands.

Beyond the Basics: Exploring More Complex Projects

Once you've mastered a few basic projects, you can gradually move on to more challenging designs. Consider building a rustic coffee table with a more intricate design, a headboard, or even a small rustic dresser. The possibilities are endless!

Commonly Asked Questions

Q: What type of wood is best for beginners?

A: Untreated pine is a great choice for beginners due to its affordability and ease of working with. Reclaimed wood adds character but might require more skill to handle.

Q: What if I make a mistake?

A: Don't worry, everyone makes mistakes! Woodworking is a learning process. Try to fix the mistake if possible, or just start over. It's all part of the experience.

Q: Where can I find plans for more complex projects?

A: There are tons of resources online, including websites and YouTube channels dedicated to woodworking. Look for plans that match your skill level and interests.

Q: Do I need expensive tools to get started?

A: Not at all! You can start with basic hand tools and gradually add power tools as you become more comfortable and experienced.

Q: How do I finish my project?

A: You can use stain, paint, or a clear sealant to finish your project. The choice depends on your personal preference and the overall style you're going for.

So, what are you waiting for? Grab your tools, choose a project, and let's build something amazing! Remember, the most important thing is to have fun and enjoy the process. Happy building!

Share:

Craft Country-style Wooden Furniture with These Easy Woodworking Plans

Craft Country-Style Wooden Furniture with These Easy Woodworking Plans

Embrace the charm of rustic elegance by building your own country-style wooden furniture! These easy-to-follow woodworking plans guide you through creating beautiful and functional pieces that will add warmth and character to your home. Whether you're a seasoned craftsman or a beginner eager to learn, these projects offer satisfying results and a unique sense of accomplishment.

A Rustic Coffee Table: Simple Elegance

Start your country-style furniture journey with a classic coffee table. This project utilizes readily available materials and straightforward techniques, making it ideal for beginners. We'll guide you through selecting sturdy pine or reclaimed wood, cutting the pieces to size using a circular saw, and assembling the frame with robust wood screws. Careful sanding is essential to achieve a smooth surface before applying a protective stain and sealant. The final touch? Adding simple, yet elegant, wooden legs for a touch of rustic charm. This coffee table will become a focal point in your living room, showcasing your craftsmanship and adding a touch of countryside charm to your space.

Materials You'll Need:

  • Pine or reclaimed wood planks
  • Wood screws
  • Wood glue
  • Sandpaper (various grits)
  • Wood stain
  • Wood sealant
  • Circular saw
  • Drill
  • Measuring tape
  • Level

A Charming Farmhouse Bench: Comfort and Style

Next, build a comfortable and stylish farmhouse bench perfect for your entryway or kitchen. This project emphasizes the beauty of natural wood grain. We start by selecting wide planks of cedar or oak, known for their durability and appealing grain patterns. The plan focuses on a simple, sturdy construction, using mortise and tenon joinery for added strength (or, for beginners, robust wood screws and wood glue for a simpler approach). Once assembled, apply a clear coat of varnish to enhance the natural wood beauty and protect the finish from daily wear and tear. The result? A charming bench that's as practical as it is aesthetically pleasing, instantly adding rustic charm to your home.

Tips for Success:

  • Pre-drill pilot holes before screwing to prevent wood splitting.
  • Use clamps to ensure tight joints during assembly.
  • Apply multiple thin coats of stain and sealant for even coverage.
  • Allow ample drying time between coats.

A Simple Rustic Shelf: Maximize Space and Style

Complete your country-style furniture collection with a practical and aesthetically pleasing rustic shelf. This project requires minimal tools and expertise. We'll guide you through cutting and assembling sturdy shelves from reclaimed wood or inexpensive lumber. The design uses simple brackets or even integrated supports for a rustic look. This project highlights the beauty of imperfection; knots and variations in wood grain add to the overall charm. After assembling the shelf and ensuring sturdiness, apply a natural-looking stain and sealer to protect the wood. This versatile shelf offers ample storage space while enhancing your home's rustic ambiance.

Choosing the Right Wood:

Consider the type of wood based on your desired aesthetic and budget. Pine is affordable and readily available, while reclaimed wood provides unique character and a sustainable option. Hardwoods like oak or maple offer greater durability but are typically more expensive.

These easy woodworking plans provide a fantastic opportunity to create beautiful and functional country-style furniture. So, gather your tools, choose your wood, and embark on this rewarding journey of crafting unique pieces that reflect your personal style and add a touch of rustic charm to your home. Remember safety first! Always wear appropriate safety gear, such as safety glasses and dust masks.

Share:

Beginner Furniture Plans for Simple DIY Creations

Unlock Your Inner Carpenter: Beginner Furniture Plans for Simple DIY Creations

Stepping into the world of DIY furniture can feel daunting, but it doesn't have to be! With the right plans and a little patience, you can craft beautiful, functional pieces that you'll be proud to display in your home. This guide focuses on simple projects perfect for beginners, offering detailed instructions and encouraging you to unleash your creativity. Forget expensive, mass-produced furniture – let's build something unique and personal!

Your First Project: The Humble Bookshelf

A bookshelf is a fantastic starting point for any aspiring DIY enthusiast. It offers a manageable size and straightforward design, allowing you to focus on mastering fundamental woodworking techniques. This project teaches you about measuring, cutting, assembling, and finishing – all essential skills for more complex projects down the line. We'll use readily available materials like pine or plywood, ensuring affordability and ease of handling.

Gathering Your Materials and Tools

Before you begin, gather your materials. You'll need: pine boards or plywood sheets (consider the desired size and number of shelves), wood screws (appropriate size for your wood), wood glue, sandpaper (various grits), wood stain or paint (optional), and a finish sealant (optional). Regarding tools, you'll need a measuring tape, saw (circular saw or hand saw), drill, screwdriver bits, and safety glasses.

Step-by-Step Construction

  1. Measure and cut your boards to the desired dimensions for the sides and shelves of your bookshelf. Accuracy is key here, so double-check your measurements before cutting!
  2. Apply wood glue to the ends of the shelves and position them between the side pieces. Secure them with screws, ensuring even spacing between shelves.
  3. Once the glue has dried, sand all surfaces smoothly to remove any splinters or imperfections. Start with a coarser grit sandpaper and gradually move to a finer grit for a polished finish.
  4. Apply your chosen stain or paint, following the manufacturer's instructions. Allow sufficient drying time before applying a sealant for protection.

Beyond Bookshelves: A Simple Coffee Table

Once you've conquered the bookshelf, you're ready to tackle a slightly more ambitious project: a simple coffee table. This project introduces you to more complex joinery techniques, like using pocket holes, while still remaining approachable for beginners. The satisfying result – a stylish and practical coffee table – will further fuel your DIY passion!

Choosing Your Style and Materials

Consider the aesthetic you want to achieve. A simple, minimalist design is often easiest for beginners. You'll need larger boards or plywood sheets than the bookshelf project, plus the same tools and additional joinery tools like a pocket hole jig and kreg screws. This allows for stronger, hidden joinery.

Construction Techniques

Building your coffee table involves similar steps to the bookshelf but will likely require constructing a frame first, using pocket holes to join the legs and supports. This provides strength and stability. Then, you'll add a tabletop, securing it to the frame. Remember to carefully plan your measurements and follow a clear set of plans to ensure the project's success. Consider adding caster wheels for extra mobility!

Expanding Your Skills: Future DIY Adventures

After completing these two projects, you'll have built a strong foundation in basic woodworking techniques. You'll be ready to tackle more challenging projects, such as a simple nightstand, a small desk, or even a charming bench. Remember that practice makes perfect, and every project will enhance your skills and confidence. So, grab your tools, embrace the process, and enjoy the journey of creating your own unique furniture!

Share:

Backyard Pergola Plans for Adding Shade and Style to Your Yard

Backyard Pergola Plans for Adding Shade and Style to Your Yard

Hey there, fellow backyard enthusiasts! Let's talk pergolas. Those gorgeous, shady structures that instantly elevate any outdoor space. Whether you dream of romantic dinners under the stars, lazy afternoons with a good book, or simply a cooler spot to hang out on a scorching summer day, a pergola is your ticket to backyard bliss. And the best part? Building one (or having one built) isn't as daunting as you might think. This guide will walk you through everything you need to know about planning and building your dream pergola.

Choosing the Perfect Pergola Design for Your Space

Before you even think about grabbing a hammer, let's talk design. The right pergola should complement your home's style and seamlessly integrate with your existing landscape. There's a whole world of pergola designs out there, so let's explore some options.

Size and Placement:

First things first: how big do you want your pergola to be? Consider the size of your backyard and the area you want to shade. A small pergola might be perfect for a cozy seating area, while a larger one could cover a patio or deck. Think about the flow of your yard – where do you naturally gravitate to when you're outside? Positioning your pergola strategically will maximize its use and enhance your outdoor living experience.

Style:

From rustic charm to sleek modern lines, pergolas come in a variety of styles. Rustic pergolas often feature rough-hewn wood and natural materials, creating a warm and inviting atmosphere. Modern pergolas tend to be more minimalist, with clean lines and perhaps metal accents. Traditional pergolas often incorporate classic architectural details. Browse online for inspiration – Pinterest is a great resource! You can even combine elements from different styles to create something unique.

Materials:

The material you choose will significantly impact your pergola's look, durability, and maintenance requirements. Wood is a popular choice, offering a natural beauty and warmth. However, it requires regular maintenance to protect it from the elements. Metal pergolas, like those made from aluminum or steel, are low-maintenance and incredibly durable but might feel less inviting than wood. Vinyl pergolas offer a good balance of durability and low maintenance but may not be as aesthetically pleasing as wood or metal to some.

Planning Your Pergola Project: The Nitty-Gritty Details

Once you've chosen your design, it's time to get down to the specifics. This is where careful planning pays off. Don't skip this step!

Obtaining Permits:

Check with your local building department to see if you need a permit to build a pergola. Permit requirements vary by location, and failing to obtain the necessary permits could lead to fines or even demolition. It's always better to be safe than sorry!

Budgeting:

Pergolas can range in cost from a few hundred dollars for a simple DIY project to several thousand dollars for a custom-built structure. Factor in the cost of materials, tools (if you're doing it yourself), labor (if hiring a contractor), and any permits. Create a detailed budget to avoid cost overruns.

Foundation:

The foundation is crucial for the stability and longevity of your pergola. The type of foundation you need will depend on the size and weight of your pergola and the type of soil you have. Options include concrete footings, piers, or even simply setting the posts in the ground, depending on the size and local soil conditions.

Tools and Materials List:

Before you begin, create a comprehensive list of all the tools and materials you'll need. This includes everything from lumber and fasteners to post hole diggers and levels. This minimizes trips to the hardware store during the project, saving you both time and frustration.

Building Your Pergola: Step-by-Step Guidance

Okay, the fun part! Building a pergola is a rewarding experience, even if you've never tackled a project like this before. Remember to take your time, follow safety guidelines, and don't hesitate to ask for help if needed.

Laying the Foundation:

Start by marking the location of your pergola's posts. Dig holes according to your chosen foundation type and set the posts in place, ensuring they're perfectly level. This is the most crucial step, as any imperfections here will be amplified throughout the entire structure.

Framing the Structure:

Once your posts are securely in place, it's time to frame the pergola. This involves connecting the top beams (often called rafters) to the posts. Use appropriate fasteners and ensure the frame is square and level. Pay close attention to details and use a level frequently.

Adding the Roofing:

This is where you can get creative! You can choose to add a solid roof, lattice work, or even just leave it open. A solid roof offers more shade and protection from the elements, while lattice work allows for dappled sunlight and a more airy feel. Consider adding climbing plants for additional shade and a touch of nature.

Finishing Touches:

Once your pergola is structurally complete, it's time for the finishing touches. This might include staining or painting the wood, adding decorative elements, or installing lighting. Let your personal style shine through!

Adding Personal Touches to Your Pergola

Your pergola is more than just a structure; it's an extension of your home and personality. Consider these additions to make it truly your own:

  • Climbing plants: Vines like ivy, jasmine, or wisteria can transform your pergola into a verdant oasis.
  • Lighting: String lights, lanterns, or spotlights can create a magical ambiance in the evening.
  • Outdoor furniture: Choose comfortable seating that complements your pergola's style.
  • Decorative accents: Add throw pillows, rugs, or artwork to personalize your space.

Commonly Asked Questions

  • Q: How long does it take to build a pergola? A: The time it takes to build a pergola varies depending on its size and complexity, as well as your experience level. A simple pergola can be built in a weekend, while a more elaborate structure might take several weeks.
  • Q: How much does a pergola cost? A: The cost of a pergola varies greatly depending on size, materials, and whether you hire a contractor. Expect to spend anywhere from a few hundred to several thousand dollars.
  • Q: Do I need a permit to build a pergola? A: Permit requirements vary by location. Check with your local building department before starting your project.
  • Q: What is the best material for a pergola? A: The best material depends on your budget, style preferences, and maintenance requirements. Wood is classic and beautiful, metal is durable and low-maintenance, and vinyl offers a good balance of both.
  • Q: How do I maintain my pergola? A: Regular maintenance will prolong the life of your pergola. This might include cleaning, staining or painting (for wood), and inspecting for any damage.

Building a pergola is a rewarding project that will enhance your backyard for years to come. With careful planning and attention to detail, you can create a beautiful and functional space that you'll enjoy for many summers to come. Happy building!

Share:

Outdoor Furniture Plans for Patios and Gardens

Unleash Your Inner DIYer: Outdoor Furniture Plans for Patios and Gardens

Hey there, fellow outdoor enthusiasts! So you're dreaming of a beautiful, relaxing patio or garden, but the prices of store-bought furniture are making your wallet weep? Don't worry, you're not alone! Building your own outdoor furniture is incredibly rewarding, surprisingly affordable, and lets you create pieces perfectly tailored to your space and style. This guide is packed with ideas and inspiration to get you started, from simple projects for beginners to more challenging builds for seasoned DIYers. Let's dive in!

Simple & Sweet: Beginner-Friendly Projects

If you're just starting out on your DIY journey, don't feel pressured to tackle a complex design right away. There are tons of fantastic, easy-to-build projects that will give you a taste of success and build your confidence.

Pallet Projects: The Eco-Friendly Choice

Repurposed pallets are a goldmine for outdoor furniture! They're readily available (sometimes even free!), and with a little sanding and some creativity, they transform into stunning pieces. Think simple benches, coffee tables, or even vertical planters. Just remember to check the pallets for any harmful chemicals or pests before you start your project.

Tips for working with pallets:

  • Sand thoroughly – those splinters are no fun!
  • Consider using a wood sealant or paint to protect the wood from the elements.
  • Don't be afraid to get creative with the layout and design.

Adirondack Chairs: Classic Charm

The Adirondack chair is an outdoor classic for a reason! Its comfortable design and relatively straightforward construction make it a perfect beginner project. You can find tons of free plans online, varying in complexity. Choose one that suits your skill level and available tools. Remember, measuring twice and cutting once is key to a successful build.

Materials you'll likely need:

  • Cedar or pressure-treated lumber
  • Screws
  • Wood glue
  • Sandpaper
  • Wood stain or paint (optional)

Stepping it Up: Intermediate Projects

Feeling confident after your first project? Let's move on to some more ambitious builds that will truly transform your outdoor space.

Outdoor Sofa or Loveseat: Maximum Comfort

Building your own outdoor sofa or loveseat allows you to customize the size and style perfectly to your needs. You can choose from various materials, like cedar, redwood, or even reclaimed wood. This project requires more precise cutting and assembly, so make sure to carefully follow your chosen plans. Adding comfortable cushions will elevate the comfort level significantly.

Consider these factors when designing your sofa:

  • The size and shape of your patio
  • The overall style of your outdoor space
  • The type of cushions you'll be using
  • Weather resistance of the materials

Picnic Table: A Gathering Spot

A picnic table is a fantastic addition to any outdoor space, perfect for casual meals, games, or simply relaxing with loved ones. While it requires more lumber than a chair, the construction is relatively straightforward. You can find plans for both traditional and modern designs online. Remember to properly anchor the legs for stability.

Pro Tip: Pre-drill your holes to prevent the wood from splitting when you insert the screws.

Advanced Projects for the Experienced DIYer

Now, if you're a seasoned woodworker looking for a challenge, these projects will test your skills and reward you with truly unique and stunning pieces.

Custom-Designed Pergola: Shade and Style

A pergola is a beautiful and functional addition to any patio or garden, providing shade and a focal point for your outdoor space. Designing and building a custom pergola requires advanced woodworking skills, precise measurements, and a strong understanding of structural integrity. This is a project that will truly showcase your skills.

Important considerations:

  • Local building codes and regulations
  • The weight and stability of the structure
  • The type of covering you'll be using (e.g., vines, fabric, panels)

Outdoor Daybed: Luxury and Relaxation

An outdoor daybed is the ultimate in luxurious relaxation. These projects can be incredibly intricate, requiring advanced joinery techniques and careful attention to detail. Choosing the right materials and ensuring the daybed is weather-resistant is crucial for its longevity. You can incorporate features like built-in storage or a canopy for added functionality.

Challenges to consider:

  • Complex joinery techniques
  • Creating a comfortable and supportive frame
  • Ensuring weather resistance

Choosing Your Materials: Durability Matters

Selecting the right materials is vital for the longevity of your outdoor furniture. Consider these options:

  • Cedar: Naturally resistant to rot and insects, making it an excellent choice for outdoor furniture.
  • Redwood: Similar to cedar in its durability and natural beauty.
  • Pressure-treated lumber: Treated to resist rot and insects, but may require additional sealing or staining.
  • Reclaimed wood: Adds character and sustainability, but requires careful inspection for damage.

Finishing Touches: Protection and Style

Once your furniture is built, don't forget the finishing touches! Applying a high-quality wood sealant, stain, or paint will protect it from the elements and enhance its beauty. Choose a finish that complements your overall outdoor style and provides adequate protection against UV rays, moisture, and insects.

Commonly Asked Questions

Q: What tools do I need to build outdoor furniture?

A: The specific tools you'll need will depend on the project, but generally, you'll need measuring tapes, saws (circular saw, hand saw, jigsaw), drills, screwdrivers, sandpaper, clamps, and safety glasses.

Q: Where can I find free plans?

A: Many websites and blogs offer free plans for outdoor furniture. A quick search on Google or Pinterest will reveal a wealth of options.

Q: How do I protect my furniture from the weather?

A: Applying a high-quality wood sealant, stain, or paint is essential. Consider using weatherproof cushions and storing the furniture under a cover during severe weather.

Q: How long does it take to build a piece of outdoor furniture?

A: The time required varies greatly depending on the complexity of the project and your experience level. A simple project might take a weekend, while a more complex one could take several weeks.

Happy building, and enjoy your beautiful, custom-made outdoor space!

Share:

Step-by-Step Wood Furniture Plans for DIY Builders

Unlock Your Inner Craftsman: Step-by-Step Wood Furniture Plans for DIY Builders

The satisfying scent of freshly cut wood, the satisfying thud of the hammer, the pride of crafting something beautiful and functional with your own two hands – building your own wood furniture offers a unique blend of creativity and accomplishment. This guide provides detailed, step-by-step plans to empower you to take on your next woodworking project, regardless of your skill level. We'll demystify the process, breaking down complex tasks into manageable steps, ensuring you finish your project with confidence and a stunning piece of furniture to show for it.

Choosing Your Project: From Simple to Sophisticated

Before you dive into the sawdust, selecting the right project is crucial. Beginners might find success with simpler projects that build foundational skills, while experienced builders can tackle more intricate designs. Consider your skill level, available tools, and the desired outcome. A simple bedside table requires fewer tools and less precision than a complex, handcrafted dining table. However, the satisfaction gained from creating anything, no matter the complexity, is immeasurable.

Beginner-Friendly Projects:

  • Floating Shelves: A perfect introductory project requiring only basic tools and straightforward cuts.
  • Simple Bookcase: This teaches you about assembling frames and shelves, crucial skills for more complex projects.
  • Small Coffee Table: Provides experience working with larger pieces of wood and potentially incorporating joinery techniques.

Intermediate & Advanced Projects:

  • Dining Table: Demands precise cuts, joinery, and potentially intricate leg designs.
  • Dresser: A challenging project requiring advanced joinery skills, drawer construction, and precise measurements.
  • Custom-Built Desk: Allows for personalization and customization, requiring advanced planning and execution.

Essential Tools & Materials: Gathering Your Arsenal

Having the right tools is paramount for a successful project. Avoid shortcuts; investing in quality tools will make the process easier, safer, and ultimately yield a superior result. Don't feel pressured to buy everything at once; start with the basics and gradually expand your collection as your skills and ambitions grow.

Essential Tools:

  • Measuring Tape & Pencil: Precise measurements are the foundation of any woodworking project.
  • Hand Saw or Circular Saw: For cutting wood to the necessary dimensions.
  • Drill & Drill Bits: Crucial for creating pilot holes and assembling pieces.
  • Screwdriver (or impact driver): For fastening components securely.
  • Safety Glasses & Ear Protection: Protecting your eyes and hearing is paramount.

Essential Materials:

  • Wood: Choose a wood type suitable for your project and budget. Consider factors like durability, workability, and aesthetics.
  • Wood Glue: Creates strong, durable joints.
  • Screws: Select the appropriate size and type for your wood and application.
  • Sandpaper: Essential for smoothing surfaces and creating a professional finish.
  • Wood Finish (optional): Protects the wood and enhances its appearance.

Step-by-Step Construction: Building Your Masterpiece

Once you've chosen your project and gathered your materials, it's time to build! Each project will have its own specific steps, but the general process usually follows a similar pattern. Carefully follow your chosen plan, paying close attention to details and measurements. Take your time, and don't be afraid to ask for help or consult online resources if you encounter challenges.

Example Steps (Simple Shelf):

  1. Cut the wood: Using precise measurements, cut the shelf and support pieces to the desired dimensions.
  2. Sand the edges: Smooth all cut edges to prevent splinters and create a professional finish.
  3. Pre-drill pilot holes: This prevents wood splitting when screwing the supports to the wall.
  4. Attach the supports to the wall: Use appropriate wall anchors for secure mounting.
  5. Attach the shelf to the supports: Securely fasten the shelf using screws or other chosen fasteners.
  6. Apply a finish (optional): Enhance the appearance and protect the wood with a stain, varnish, or other finish.

Remember, patience and precision are key! Take pride in your work, and enjoy the rewarding experience of creating something beautiful and functional with your own hands.

Share:

Unique Pergola Plans for Crafting a Statement Outdoor Structure

Unique Pergola Plans for Crafting a Statement Outdoor Structure

Transform your outdoor space from ordinary to extraordinary with a custom-designed pergola. Forget cookie-cutter designs; this guide empowers you to craft a statement piece that perfectly reflects your style and enhances your home's aesthetic appeal. We'll explore unique pergola plans, moving beyond the traditional square or rectangular structures, to create an outdoor haven that's both functional and visually stunning.

Beyond the Box: Exploring Unconventional Shapes and Sizes

Dare to break free from the confines of conventional pergola designs. Consider a hexagonal or octagonal pergola for a truly unique look. These shapes offer interesting angles and visual complexity, adding a touch of architectural intrigue to your landscape. Imagine the possibilities: a sprawling octagonal pergola draped in climbing roses, creating a fragrant, romantic retreat, or a sleek hexagonal pergola providing shade for an outdoor dining area. Don't limit yourself to standard dimensions. A smaller, intimate pergola can create a cozy reading nook, while a larger structure can become the heart of your outdoor entertaining space. Consider the scale of your garden and the surrounding architecture when choosing your pergola's size and shape.

Hexagonal Haven: A Romantic Retreat

A hexagonal pergola offers a captivating blend of elegance and practicality. Its multiple sides allow for varied seating arrangements and climbing plants to cascade from multiple points, creating a lush, verdant canopy. Imagine stringing fairy lights across the angled beams for a magical ambiance in the evening. The unique shape adds a touch of sophistication that complements both traditional and modern homes.

Octagonal Oasis: The Centerpiece of Your Outdoor Living

For a truly grand statement, consider an octagonal pergola. Its symmetrical design lends itself beautifully to a variety of styles, from rustic charm to contemporary minimalism. The ample space underneath provides the perfect setting for outdoor dining, lounging, or even a small outdoor kitchen. The multiple posts create a strong, visually striking framework that will command attention.

Material Magic: Choosing the Perfect Building Blocks

The material you select significantly impacts the overall aesthetic and longevity of your pergola. Beyond the typical wood, explore a range of materials to achieve your desired look and feel. Consider these options:

  • Reclaimed Wood: Adds rustic charm and sustainability to your project. The unique character of reclaimed wood brings a sense of history and authenticity to your outdoor space.
  • Metal: Offers modern sleekness and durability. Powder-coated steel or aluminum can withstand the elements and provides a clean, contemporary look.
  • Bamboo: A sustainable and lightweight choice, offering a tropical, airy feel. Perfect for creating a relaxed, bohemian atmosphere.
  • Concrete: A bold and durable choice for a contemporary, minimalist design. Concrete can be stained or painted to complement your home's exterior.

Incorporating Unique Design Elements

Elevate your pergola design beyond the basic framework by incorporating unique design features. These additions personalize your structure, making it truly one-of-a-kind.

Creative Roofing: Beyond the Standard

Don't limit yourself to a standard flat roof. Consider a curved or gabled roof for a more elaborate design. Incorporate different materials into the roof – perhaps a combination of wood slats and translucent polycarbonate panels for dappled shade and diffused light. A living roof, planted with drought-tolerant succulents, adds an eco-friendly touch and creates a beautiful, green canopy.

Integrated Seating and Lighting: Seamless Style

Seamlessly integrate seating into the design of your pergola. Built-in benches or a curved seating area beneath the structure create a welcoming and functional space. Strategically placed lighting – both ambient and accent – enhances the ambiance, extending the usability of your pergola into the evening hours. Consider solar-powered lighting for an environmentally conscious choice.

By carefully considering shape, materials, and unique design elements, you can craft a pergola that's not just a structure, but a stunning focal point of your outdoor landscape, a testament to your individual style and a truly unique addition to your home.

Share:

Traditional Wishing Well Woodworking Plans for Landscaping

Build Your Own Charming Wishing Well: A Complete Guide

Hey there, fellow DIY enthusiasts! Ever dreamed of adding a touch of whimsical charm to your garden or landscaping? A traditional wishing well is the perfect way to do it! Forget those flimsy, mass-produced versions – we're talking about crafting a truly beautiful and sturdy well, the kind that whispers tales of old-world craftsmanship. And guess what? It's totally doable, even if you're not a seasoned woodworker. This guide will walk you through building your own wishing well from start to finish.

Planning Your Wishing Well Project

Before you grab your tools, let's get organized! This isn't just about throwing some wood together; we're building something special.

Choosing the Right Wood

The type of wood you choose will significantly impact the well's longevity and aesthetic. Cedar and redwood are excellent choices because they naturally resist rot and insects. They also have a beautiful, rich color that ages gracefully. Pressure-treated lumber is another option, offering durability but potentially lacking the same visual appeal. Consider your budget and desired aesthetic when making your selection. Remember, you'll need enough lumber for the sides, roof, base, and any decorative elements you plan to add.

Designing Your Well: Size and Shape

How big do you want your wishing well to be? Consider the space you have available and the overall scale of your landscape. A smaller well might fit better in a cozy garden, while a larger one would make a statement in a spacious yard. The most traditional shape is octagonal, but you can also build a square, hexagonal, or even round well. Sketch out a few designs to visualize the final product and determine the dimensions of your materials. Don't forget to account for the thickness of the lumber you'll be using in your calculations.

Gathering Your Tools and Materials

Make a comprehensive list to avoid mid-project scrambling! You'll need basic woodworking tools such as:

  • Measuring tape and pencil
  • Saw (circular saw or hand saw)
  • Drill and drill bits
  • Screwdriver (or impact driver)
  • Wood glue
  • Clamps
  • Sandpaper (various grits)
  • Wood stain or sealant (optional)
  • Exterior-grade screws or bolts
  • Level

Remember to purchase all your lumber and any additional hardware, like hinges for the roof if you want it to open, and a bucket or container to fit inside the well.

Building the Wishing Well Structure

Now for the fun part! Let's construct the main body of your wishing well. I recommend following these steps:

Constructing the Well Sides

Depending on your design (octagonal, square, etc.), cut your lumber to the appropriate lengths for the well sides. Remember to account for the joints and how they will fit together. For an octagonal well, you'll need eight sides. Use wood glue and screws to assemble the sides, creating a strong and stable structure. Clamps will be your best friend here, ensuring everything stays perfectly aligned while the glue dries.

Building the Base

The base should be slightly larger than the well sides to provide stability. Construct a sturdy base from lumber, using the same techniques as for the well sides. You may want to consider adding some decorative elements to the base, such as molding or trim. Ensure the base is level before attaching the well sides to it.

Adding the Roof

The roof is a key element of the wishing well's charm. Design a roof that complements the well's overall style. You could create a simple gable roof, a more elaborate hipped roof, or even a charming shingled roof. Cut the lumber according to your design and carefully attach it to the top of the well sides. Consider adding decorative details like finials or weather vanes.

Finishing Touches

Once the structure is complete, it's time to add the finishing touches. Sand down any rough edges and imperfections to ensure a smooth surface. Apply a wood stain or sealant to protect the wood from the elements and enhance its natural beauty. Choose a color that complements your garden's existing palette. Don't forget to add the bucket! This is the final element to complete your very own wishing well.

Adding Personal Touches and Decorations

Now that you have the functional structure completed, it's time to inject your personality. Let's consider adding some personality!

Decorative Elements

There's a whole world of decorative possibilities! Consider adding:

  • Carving or painting decorative designs onto the wood.
  • Attaching whimsical elements like small figurines, flowers, or even a miniature wishing well sign.
  • Using different types of wood to create contrasting textures and colors.
  • Incorporating metal accents like wrought iron brackets or hinges.

Lighting

Adding lighting enhances the well's ambiance, particularly in the evenings. Consider solar-powered lights or low-voltage landscape lighting to highlight the well's design and create a magical atmosphere.

Placement

Think carefully about where you'll place your wishing well. It should be a focal point in your landscape, but also accessible and not obstructing pathways or other features.

Commonly Asked Questions

Here are some questions I frequently get asked about building wishing wells:

Q: How long does it take to build a wishing well?

A: The time it takes depends on the complexity of your design and your woodworking experience. A simple well could take a weekend, while a more elaborate design might take several days or even a week.

Q: Can I use recycled or reclaimed wood?

A: Yes, but make sure the wood is in good condition and suitable for outdoor use. Inspect it carefully for any signs of rot or insect damage.

Q: How do I prevent water damage?

A: Use a high-quality wood sealant or stain designed for outdoor use. Ensure that the well is properly drained to prevent water from accumulating inside.

Q: What if I'm not experienced in woodworking?

A: Don't worry! Start with a simpler design and take your time. There are plenty of online resources and tutorials available to help you learn the necessary skills. Consider enlisting the help of a more experienced woodworker if needed.

Q: What kind of bucket should I use?

A: Use a metal bucket (galvanized steel is a good option) or a wooden bucket that's treated for outdoor use. Make sure it's sized appropriately for the well opening.

I hope this comprehensive guide helps you create your dream wishing well! Remember to have fun and personalize your project to reflect your unique style. Happy building!

Share: